2010年11月24日星期三

Setting up a Corporate Signature

Exchange 2000 and Exchange 2003

Exchange 2000 and Exchange 2003 do not directly offer features to set up managed signatures and disclaimer text. A supported method is to use an SMTP transport event sink. Microsoft has provided the required code for this in order to achieve that via Visual Basic or VBScript.

Exchange 2007

Exchange 2007 has the Transport Rules feature which you can use to set up a default disclaimer for each outgoing email message.

  1. Open the Exchange Management Console.
  2. In Organization Configuration select Hub Transport and then select the Transport Rules tab.
  3. In the Actions Pane click New Transport Rule…
  4. Name your rule and optionally add a Comment. For instance;
    Name: Corporate disclaimer
    Comment: This transport rule adds a standardized disclaimer text to all outgoing emails.
  5. Press Next.
  6. On the Conditions screen select the following 2 conditions;
    • from users inside or outside the organization
    • sent to users inside or outside the organization
  7. In the bottom pane, modify the conditions so that they read;
    • from users Inside the organization
    • and sent to users Outside the organization
  8. Press Next.
  9. In the Actions screen select the action;
    • append disclaimer text using font, size, color with separator and fall back to action if unable to apply.
  10. In the bottom pane you can modify the conditions to your preference.
    • Click on disclaimer text to set your default text.
      Note that the disclaimer text is Plain Text only so you can't type HTML code. If you want to add a link, you'll have to type it in full.
  11. Once done, press Next.
  12. You can set any exception as you see fit. You can continue without any exceptions as well.
  13. Press Next.
  14. On the Create Rule screen you'll see the PowerShell command that will be executed when clicking the New button.
  15. After pressing the New button the wizard has been completed and a summary is shown. Assuming it completed successfully, your Transport Rule has been created and is active now. Clicking Finish will close the New Transport Rule dialog.
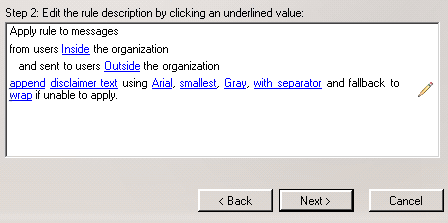
Disclaimer options in Exchange 2007

Exchange 2010

Exchange 2010 also has the Transport Rules feature just as Exchange 2007 but has support for some additional customization as well. The most notable regarding signatures is that HTML code is now supported and that you can also use user information that has been stored in Active Directory to construct the signature dynamically.

  1. Open the Exchange Management Console.
  2. In Organization Configuration select Hub Transport and then select the Transport Rules tab.
  3. In the Actions Pane click New Transport Rule…
  4. Name your rule and optionally add a Comment. For instance;
    Name: Corporate signature
    Comment: This transport rule adds a standardized signature and disclaimer text to all outgoing emails.
  5. Press Next.
  6. On the Conditions screen select the following 2 conditions;
    • from users that are inside or outside the organization
    • sent to users that are inside or outside the organization, or partners
  7. In the bottom pane, modify the conditions so that they read;
    • from users that are Inside the organization
    • and sent to users that are Outside the organization
  8. Press Next.
  9. In the Actions screen select the action;
    • append disclaimer text and fall back to action if unable to apply.
  10. In the bottom pane you can modify the conditions to your preference.
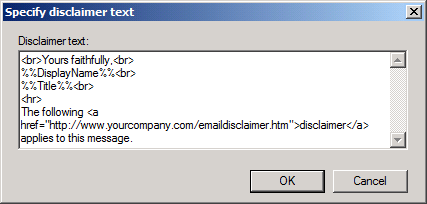
    • Click on disclaimer text to insert your default disclaimer text and add variables to include user information (see below for an overview of variables which you can use).
      Note that the disclaimer text allows you to use HTML code (including in-line CSS). This will allow you for instance to set different font size and colors for the signature and disclaimer part, add a horizontal line, hyperlink text or include a logo.
    • You can use up to 5000 characters
    • When a Plain Text message is sent, the HTML tags are automatically stripped off.
  11. Once done, press Next.
  12. You can set any exception as you see fit. You can continue without any exceptions as well.
  13. Press Next.
  14. On the Create Rule screen you'll see the PowerShell command that will be executed when clicking the New button.
  15. After pressing the New button the wizard has been completed and a summary is shown. Assuming it completed successfully, your Transport Rule has been created and is active now. Clicking Finish will close the New Transport Rule dialog.

Supported variables
You can use the following variables in your disclaimer text. When using them, place them between %% characters.
Example: %%DisplayName%%

UserLogonName
DisplayName
FirstName
Initials
LastName

PhoneNumber
OtherPhoneNumber
HomePhoneNumber
OtherHomePhoneNumber
PagerNumber
MobileNumber
FaxNumber
OtherFaxNumber
Email
Street
POBox
City
State
ZipCode
Country

Title
Department
Manager
Office
Company

Notes
CustomAttribute1 – CustomAttribute15


Disclaimer template text in Exchange 2010
Disclaimer template text with HTML and variables in Exchange 2010

Outlook Signature deployment via script

If you are not using Exchange or are looking for a client (Outlook) level solution to generate your signatures, you can do this via a script. There are various ways to do this of course but there are a couple of common things to keep in mind when going for a custom script;

  • The signature has to end up in the user's Signatures folder.
  • A single signature contains a Plain Text, HTML and Rich Text version of your template with their corresponding file formats;
    *.txt, *.htm and *.rtf
  • You'll need to query Active Directory via LDAP if you want to include user specific information.
  • Consider how you want to update the signature. For instance;
    Are you going to run the script each time at logon or only once and then users can run the script manually via a Start Menu shortcut?
  • Are you going to disable access to the Signature feature via Group Policies?
  • Note that you cannot set the deployed signature as the default via Group Policies; this requires an additional script that queries the mail profile registry and sets the appropriate registry keys (see below script example for further details).
Set generated signature as the default signature

As mentioned before, you'll require an additional script if you want to set the generated signature directly as the default in Outlook without any additional user interaction. This additional script can be simplified if all your mail profiles are named the same in your organizations and have been created by a prf-script via the Office Resource Kit (ORT) or Office Customization Tool (OCT).

When you automated the mail profile creation process, then it could be that the mail profile registry is structured in the same way on all your clients. Setting the created signature as the default can then be done via an import of exported registry keys. If not, you'll have to query the mail profile registry keys via a vbs-script and set the values accordingly. The registry keys involved are structured in the following way;

Key: HKEY_CURRENT_USER\Software\Microsoft\Windows NT\CurrentVersion\Windows Messaging Subsystem\Profiles\\9375CFF0413111d3B88A00104B2A6676\<########>

In the key, replace with the default mail profile name for your company and <########> with the number representing the mail account ID to be configured with the default signature.

In this key set the following value names and types;
Value name: New Signature
Value name: Reply-Forward Signature
Value type: REG_BINARY

As for the value for this key, since these are binary keys, the easiest would be to export these 2 values from a correctly configured machine to determine their corresponding value.


ref: http://www.howto-outlook.com/howto/corporatesignatures.htm

OWA signature length issue

A client who was changing their email signatures wanted to standardise on the same sigs for Outlook based and OWA users. Then OWA started to complain that the signature was too big. On checking I realised that the default 2007 limit is quite small 4K but that with a registry change it could be increased to 16 K

The default SignatureMaxLength value is 4096 (4KB) and the maximum value is 16672 (16KB).

HKEY_LOCAL

so you need to add to the registry

HKEY_LOCAL_MACHINE\SYSTEM\CurrentControlSet\Services\MSExchangeWeb OWA

SignatureMaxLength – DWORD and set value to 4120 in Hex or 16672 in decimal

or save the lines below to a .reg file on the server in question and import that way

Windows Registry Editor Version 5.00

[HKEY_LOCAL_MACHINE\SYSTEM\CurrentControlSet\Services\MSExchangeWeb OWA]
“SignatureMaxLength”=dword:00004120

ref: http://www.secure-eserver.com/?p=911

2010年11月18日星期四

如何限制為僅一個網域使用者使用的電腦

從清單移除 「 NT AUTHORITY\Authenticated Users 」 使用選項 B: 使用者群組


如果要排除選項, 登入到一個或一些電腦, 請遵循下面指示:

1. 按滑鼠右鍵一下桌上型電腦上的 「 我的電腦 」 圖示。

2. 請選擇 [ 管理 」 上。

3. 解壓縮 「 本機使用者和群組 」。

4. 按一下 < 群組 >。

5. 在螢幕右方之 「 使用者 」 群組上按兩下。

6. 移除: 「 NT AUTHORITY\Authenticated 使用者 」 從清單中

7. 新增和群組加入至 「 使用者 」 本機群組 / 秒或需要使用者 / s


向右上本機電腦 / s C: 選項設定 「 拒絕本機登入 」 使用者


如果要排除選項, 登入到一個或一些電腦, 請遵循下面指示:

1. 移至 [ 開始 ] - > 「 執行 」

2. 寫入 " Gpedit . msc "

3. 啟用 「 拒絕本機登入 」 使用者權利, 來源網域使用者帳戶 / s。

附註: 某些服務 (Like 備份軟體服務) 可能會影響依此原則和 wouldnÆt 函式。


拒絕在本機登入

http://www.microsoft.com/resources/documentation/windows/xp/all/proddocs/en-us/537.mspx


3. 在本機電腦上執行 " Gpupdate / force 」。


D: 選項使用選擇性驗證當使用樹系信任


建立樹系信任

http://www.microsoft.com/technet/prodtechnol/windowsserver2003/library/Operations/544d5801-205e-45b0-a1d7-cb9c39a7d709.mspx

REF: http://support.microsoft.com/kb/555317

2010年11月16日星期二

Offline Domain Join (Djoin.exe) Step-by-Step Guide

The following procedures show how to grant the user rights with Group Policy and how to delegate the correct permissions.
Granting user rights to join workstations to the domain

You can use the Group Policy Management Console (GPMC) to modify the domain policy or create a new policy that has settings that grant the user rights to add workstations to a domain.

Membership in Domain Admins, or equivalent, is the minimum required to grant user rights. Review details about using the appropriate accounts and group memberships at Local and Domain Default Groups (http://go.microsoft.com/fwlink/?LinkId=83477).
To grant rights to join workstations to a domain

1.

Click Start, click Administrative Tools, and then click Group Policy Management.
2.

Double-click the name of the forest, double-click Domains, double-click the name of the domain in which you want to join a computer, right-click Default Domain Policy, and then click Edit.
3.

In the console tree, double-click Computer Configuration, double-click Policies, double-click Windows Settings, double-click Security Settings, double-click Local Policies, and then double-click User Rights Assignment.
4.

In the details pane, double-click Add workstations to domain.
5.

Select the Define these policy settings check box, and then click Add User or Group.
6.

Type the name of the account that you want to grant the user rights to, and then click OK twice.

Delegating permissions to join workstations to the domain

You can use a tool such as Ldp.exe to delegate permissions to join workstations to a domain. As a best practice, you should delegate permissions to a group, and then add users to the group or remove them as needed.

Membership in Domain Admins, or equivalent, is the minimum required to delegate permissions. Review details about using the appropriate accounts and group memberships at Local and Domain Default Groups (http://go.microsoft.com/fwlink/?LinkId=83477).
To delegate permissions to join workstations to a domain

1.

Click Start, click Run, type ldp, and then click OK.
2.

Click Connection, click Connect, and in Server type the name of a domain controller. If you are logged on to a domain controller, you can type localhost. When you are done, click OK.
3.

Click Connection, and then click Bind. If you are logged on as a member of the Domain Admins group, click Bind as currently logged on user. If you are logged on as a different user, click Bind with credentials, and then type the name, password, and domain of an account that is a member of the Domain Admins group. Click OK.
4.

Click View, click Tree, select DC=, and then click OK.
5.

In the console tree, double-click DC=, right-click CN=Computers,DC=, click Advanced, click Security Descriptor, and then click OK.
6.

Click ACE, click Add ACE, type the name of the account that you want to be able to join workstations to the domain, select the Create child check box, and then select the Inherit check box. In Object type, select computer ? class (you might have to type computer to select computer ? class), click OK, and then click Update.

Offline domain join process and Djoin.exe syntax

Run Djoin.exe at an elevated command prompt to provision the computer account metadata. When you run the provisioning command, the computer account metadata is created in a .txt file that you specify as part of the command. After you run the provisioning command, you can either run Djoin.exe again to request the computer account metadata and insert it into the Windows directory of the destination computer or you can save the computer account metadata in an Unattend.xml file and then specify the Unattend.xml file during an unattended operating system installation of the destination computer.

For more information about the NetProvisionComputerAccount function that is used to provision the computer account during an offline domain join, see NetProvisionComputerAccount Function (http://go.microsoft.com/fwlink/?LinkId=162426). For more information about the NetRequestOfflineDomainJoin function that runs locally on the destination computer, see NetRequestOfflineDomainJoin Function (http://go.microsoft.com/fwlink/?LinkId=162427).

2010年11月11日星期四

Installing Exchange Server 2010 Pre-Requisites on Windows Server 2008 (2)

KB979099 http://support.microsoft.com/?kbid=979099

KB979744
http://support.microsoft.com/?kbid=979744
http://code.msdn.microsoft.com/KB979744/Release/ProjectReleases.aspx?ReleaseId=3993

KB983440
http://code.msdn.microsoft.com/KB983440/Release/ProjectReleases.aspx?ReleaseId=4410

KB977020
http://code.msdn.microsoft.com/KB977020/Release/ProjectReleases.aspx?ReleaseId=4115

KB982867
http://code.msdn.microsoft.com/KB982867/Release/ProjectReleases.aspx?ReleaseId=4520

http://www.microsoft.com/downloads/en/details.aspx?FamilyID=e5e7aa8d-e110-4736-81ae-2ef81338b46b&displaylang=en

http://go.microsoft.com/fwlink/?LinkID=180958
http://go.microsoft.com/fwlink/?LinkID=180957

MXTool

Installing Exchange Server 2010 Pre-Requisites on Windows Server 2008

Installing Exchange Server 2010 Pre-Requisites on Windows Server 2008

Exchange Server 2010 can be installed on either Windows Server 2008 64-bit with Service Pack 2, or Windows Server 2008 64-bit R2, and either Standard or Enterprise editions.

In this post I’ll walk through installing the pre-requisites for Exchange Server 2010 on Windows Server 2008. If you’re looking for the pre-requisites for Windows Server 2008 R2 go here instead.

First, install the following software components.

  1. .NET Framework 3.5 Service Pack 1
  2. .NET Framework 3.5 Family Update
  3. Windows Remote Management and Windows PowerShell 2.0
  4. 2007 Office System Converter: Microsoft Filter Pack (for Hub Transport and Mailbox Server roles only)
  5. (adding by TheOrange) Microsoft Office 2010 Filter Packs
  6. (adding by TheOrange) install RAST-ADDS(AD DS 管理单元和命令行工具)
    Add-WindowsFeature RSAT-ADDS

    install IIS 7.5 以及 IIS6 元数据兼容性(IIS6 Metabase)组件
    Add-WindowsFeature Web-Server
    Add-WindowsFeature Web-Basic-Auth
    Add-WindowsFeature Web-Metabase

    ServerManagerCmd -i Web-Server Web-Metabase Web-Lgcy-Mgmt-Console Web-Basic-Auth Web-Windows-Auth Web-Net-Ext Web-Digest-Auth Web-Dyn-Compression NET-HTTP-Activation Web-ISAPI-Ext RPC-over-HTTP-proxy RSAT-ADDS
  7. Login user must be an Enterprise Admin

Run the following from an elevated command prompt.

C:\>sc config NetTcpPortSharing start= auto

Next we need to install the operating system components. The Exchange source files contain a series of ServerManagerCmd.exe answer files in XML format that can be used to install the operating system pre-requisites for each of the server roles.

scripts

Each file relates to a specific Exchange 2010 deployment scenario.

  • exchange-all.xml – all server roles
  • exchange-base.xml – only the requirements for Forest and Domain prep operations
  • exchange-cadb.xml – Central Admin Database role
  • exchange-cas.xml – Client Access Server role
  • exchange-eca.xml – Central Admin role
  • exchange-edge.xml – Edge Transport Server role
  • exchange-hub.xml – Hub Transport Server role
  • exchange-mbx.xml – Mailbox Server role
  • exchange-typical.xml – Typical Exchange server (Client Access, Hub Transport, and Mailbox Server roles)
  • exchange-um.xml – Unified Messaging role

For example, here is the contents of the exchange-cas.xml file.

casxml

Execute any of the answer files using ServerManagerCmd.exe and the -inputPath parameter (that can be shortened to -ip). Here I am installing the pre-requisites for a “Typical” Exchange 2010 server.

C:\Admin\Exchange 2010\scripts>servermanagercmd -ip exchange-typical.xml
.............................

Start Installation...

Skipping [.NET Framework 3.0 Features] .NET Framework 3.0 Features because it is
already installed on this computer.

[Installation] Succeeded: [.NET Framework 3.0 Features] WCF Activation.
[Installation] Succeeded: [Web Server (IIS)] Management Tools.
[Installation] Succeeded: [Web Server (IIS)] Web Server.
[Installation] Succeeded: [Remote Server Administration Tools] Feature Administr
ation Tools.
[Installation] Succeeded: [Remote Server Administration Tools] Role Administrati
on Tools.
[Installation] Succeeded: [Remote Server Administration Tools] Active Directory
Domain Services Tools.
[Installation] Succeeded: [Web Server (IIS)] Performance.
[Installation] Succeeded: [Web Server (IIS)] IIS 6 Management Compatibility.
[Installation] Succeeded: [Web Server (IIS)] Health and Diagnostics.
[Installation] Succeeded: [Web Server (IIS)] Application Development.
[Installation] Succeeded: [Web Server (IIS)] Security.
[Installation] Succeeded: [Web Server (IIS)] Common HTTP Features.
<100/100>

Success: A restart is required to complete the installation.

C:\Admin\Exchange 2010\scripts>

If you want the restart to happen automatically add the -restart option to the command.

C:\Admin\Exchange 2010\scripts>servermanagercmd -ip exchange-typical.xml -restart

The server is now ready for installation of Exchange Server 2010.

ready


ref: http://exchangeserverpro.com/installing-exchange-server-2010-pre-requisites-on-windows-server-2008

other ref: http://www.5dmail.net/html/2009-5-3/200953224522.htm

http://www.exchangecn.com/html/exchange2010/20100204_85.html

2010年11月9日星期二

Step By Step Guide for Windows Server 2008 Domain Controller and DNS Server Setup

This tutorial will explain how to setup Windows Server 2008 Domain Controller and DNS
Server.

Click on Start > Run


Now type dcpromo > Click OK

The system will start checking if Active Directory Domain Services ( AD DS) binaries are installed, then will start installing them. The binaries could be installed if you had run the dcpromo command previously and then canceled the operation after the binaries were installed.

The Active Directory Domain Services Installation Wizard will start, either enable the checkbox beside Use Advanced mode installation and Click Next , or keep it unselected and click on Next

The Operating System Compatibility page will be displayed, take a moment to read it and click Next

Choose Create a new domain in a new forest, Click Next

Enter the Fully Qualified Domain Name of the forest root domain inside the textbox, click Next

If you selected Use advanced mode installation on the Welcome page, the Domain NetBIOS Name page appears. On this page, type the NetBIOS name of the domain if necessary or accept the default name and then click Next.

Select the Forest Functional Level, choose the level you desire and click on Next.

Make sure to read the description of each functional level to understand the difference between each one.

In the previous step, If you have selected any Forest Functional Level other than windows Server 2008 and clicked on Next , you would then get a page to select the domain Functional Level. Select it and then click on Next

In the Additional Domain Controller Options page, you can select to install the domain Name Service to your server. Note that the First domain controller in a forest must be a Global Catalog that’s why the checkbox beside Global Catalog is selected and it cannot be cleared. The checkbox is also selected by default when you install an additional domain controller in an existing domain, however you can clear this checkbox if you do not want the additional domain controller to be a global catalog server. The first domain controller in a new forest or in a new domain can not be a Read Only Domain Controller (RODC), you can later add a RODC but you must have at least one Windows Server 2008 Domain Controller.

I want to set my DC as a DNS Server as well, so I will keep the checkbox beside DNS server selected and click on Next

If you don’t have static ip assigned to your server you will see similar to the following screen now you need to assign static ip and start the above process.

If the wizard cannot create a delegation for the DNS server, it displays a message to indicate that you can create the delegation manually. To continue, click Yes

Now you will have the location where the domain controller database, log files and SYSVOL are stored on the server.

The database stores information about the users, computers and other objects on the network. the log files record activities that are related to AD DS, such information about an object being updated. SYSVOL stores Group Policy objects and scripts. By default, SYSVOL is part of the operating system files in the Windows directory either type or browse to the volume and folder where you want to store each, or accept the defaults and click on Next

In the Directory Services Restore Mode Administrator Password (DSRM) page, write a password and confirm it. This password is used when the domain controller is started in Directory Services Restore Mode, which might be because Active Directory Domain services is not running, or for tasks that must be performed offline.Make sure that you memorize this password when you need it.

Summary page will be displayed showing you all the setting that you have set . It gives you the option to export the setting you have setup into an answer file for use with other unattended operations, if you wish to have such file, click on the Export settings button and save the file.

DNS Installation will start

Followed by installing Group Policy Management Console, the system will check first if it is installed or not.

Configuring the local computer to host active directory Domain Services and other operations will take place setting up this server as a Domain Controller active Directory Domain Services installation will be completed, click Finish.

Click on Restart Now to restart your server for the changes to take effect.

Once the server is booted and you logon to it, click on Start > Administrative Tools
you will notice that following have been installed :
Active Directory Domains and Trusts
Active Directory Sites and Services
Active Directory Users and Computers
ADSI Edit
DNS
Group Policy Management

That’s it now your new win server 2008 domain controller with dns server setup was completed.

ref: http://www.windowsreference.com/windows-server-2008/step-by-step-guide-for-windows-server-2008-domain-controller-and-dns-server-setup/

2010年11月5日星期五

Disable "open file security warning"

Internet Explorer Enhanced Security (IEES) restricts access to scripts, executable files, and other potentially unsafe files on a UNC path unless the UNC path is added to the Local Intranet zone explicitly. For example, if you want to access \\server\share\setup.exe, you must add \\server to the Local intranet zone.

Start Internet Explorer on the Terminal Server, go to Tools - Internet Options - Security - Local Intranet zone. Add the UNC name of the server where the application is located, something like \\server.

Or configure this in a GPO:
User Configuration - Windows Settings - Internet explorer
Maintenance
Security zones and Content ratings
Local intranet

Event ID 521 — Backup Operations

Event ID 521 — Backup Operations

Updated: February 23, 2010

Applies To: Windows Server 2008 R2

red

You can use the Windows Server Backup snap-in or the wbadmin command to create and manage backups to protect your operating system, volumes, files, and application data. Backups can be saved to single or multiple disks, DVDs, removable media, or remote shared folders. They can also be scheduled to run automatically or manually.

However, system state backup is only available for the command line and is not available in the Windows Server Backup snap-in user interface. Also, you cannot configure a scheduled backup to create system state backups—but you can script the wbadmin start systemstatebackup command to run backups on a schedule.

In addition, you can use the Local Group Policy Editor snap-in (Gpedit.msc) to allow or disallow certain types of backups or backup locations. Policy settings for Windows Server Backup are located at: Local Computer Policy\Computer Configuration\Administrative Templates\Windows Components\Backup\Server.

Event Details

Product: Windows Operating System
ID: 521
Source: Microsoft-Windows-Backup
Version: 6.1
Symbolic Name: ADMIN_BACKUP_FAILED_SPP_FAILURE
Message: Backup started at '%1' failed as Volume Shadow copy operation failed for backup volumes with following error code '%2'. Please rerun backup once issue is resolved.

Resolve

Fix VSS and SPP failures

As part of a backup operation, Windows Server Backup must be able to take a shadow copy of the volumes being backed up.

Review Event Viewer for Volume Shadow Copy Service (VSS) and Shared Protection Point (SPP) failures to look for solutions, and then re-run the backup.

To perform these procedures, you must have membership in Backup Operators or Administrators, or you must have been delegated the appropriate authority.

Review event details in Event Viewer

To review event details in Event Viewer:

  1. Open Event Viewer. Click Start, click Administrative Tools, and then click Event Viewer.
  2. In the left pane, double-click Windows Logs, and then click Application.
  3. In the right pane, view the Source column, and look for events from VSS or SPP at or after the time the backup operation started.
  4. Click an event of interest, and then click the General tab.
  5. Resolve any failures that you find.

Perform a backup

To perform a one-time backup:

  1. Open an elevated Command Prompt window. Click Start, point to All Programs, click Accessories, right-click Command Prompt, and then click Run as administrator.
  2. At the prompt, type: wbadmin start backup. Use parameters, as needed. (To view the parameters and help for this command, at a command line, type: wbadmin start backup /?).

    For example, to create a backup that will be stored on drive f, of volumes e:, d:\mountpoint, and \\?\Volume{cc566d14-4410-11d9-9d93-806e6f6e6963}, type: wbadmin start backup -backupTarget:f: -include:e:,d:\mountpoint,\\?\Volume{cc566d14-44a0-11d9-9d93-806e6f6e6963}\.

Verify

To verify that backup operations are running, or will run, successfully, you should do one or more of the following, as needed:

  • For any backup operations that you have run, look for Event ID 4, which indicates that the operation completed successfully with no errors.
  • Verify that no other backup or recovery operations are running so that you can start an operation.
  • Verify that you have enabled a scheduled backup, and is configured correctly.
  • Verify that the location where you plan to store your backups is available and online.

To perform these procedures, you must have membership in Backup Operators or Administrators, or you must have been delegated the appropriate authority.

Verify the backup completed with no errors

To verify that a backup operation completed with no errors:

  1. Open Event Viewer. Click Start, click Administrative Tools, and then click Event Viewer.
  2. In the left pane, double-click Applications and Service Logs, double-click Microsoft, double-click Windows, double-click Backup, and then click Operational.
  3. In the Event ID column, look for event 4.
  4. For this event, confirm that the value in the Source column is Backup.

Verify another operation is not running

To verify that another backup or recovery operation is not running:

  1. Open an elevated Command Prompt window. Click Start, point to All Programs, click Accessories, right-click Command Prompt, and then click Run as administrator.
  2. At the prompt, type: wbadmin get status.
  3. If the command output indicates that no operation is running, then you can start a backup.

Verify scheduled backup is enabled

To verify that a scheduled backup is enabled:

  1. Open an elevated Command Prompt window. Click Start, point to All Programs, click Accessories, right-click Command Prompt, and then click Run as administrator.
  2. At the prompt, type: wbadmin enable backup.
  3. If the command output shows a schedule, then a scheduled backup is enabled.
  4. Confirm that the schedule contains the correct parameters.

Verify storage location is online

To verify that a disk used to store backups is online:

  1. For the computer that contains the storage disk, open Disk Management. Click Start, click Run, and then type: diskmgmt.msc.
  2. Click View, click Top, and then click Disk List.
  3. For the disk that contains the volume that you will use to store backups, confirm that the value in the Status column is Online.
ref: http://technet.microsoft.com/en-us/library/dd364881%28WS.10%29.aspx

2010年11月1日星期一

How to test SMTP operations using Telnet

How to test SMTP operations using Telnet

1. Telnet into Exchange server hosting IMS service using TCP port 25.
Command is telnet
25

2. Turn on local echo on your telnet client so that you can see what you are typing.
On Win 9x and NT 3.5/4.0 Telnet client this done by selecting the "preferences" from the "terminal" pull down menu, and checking the local echo radio button. For Windows 2000 telnet client, issue command "set local_echo", from the telnet command prompt.

3. Issue the following smtp command sequence

helo
response should be as follows
250 OK

mail from:
response should be as follows
250 OK - mail from

rcpt to:
response should be as follows
250 OK - Recipient

data
response should be as follows
354 Send data. End with CRLF.CRLF

To:
From:
Subject:
.

response should be as follows
250 OK

quit


ref: http://exchange.mvps.org/smtp_frames.htm

2010年10月29日星期五

Exchange Server 2007 Resource Mailboxes Part 2 – Equipment Mailboxes

Exchange Server 2007 Resource Mailboxes Part 2 – Equipment Mailboxes

Written by Paul Cunningham on May 25, 2009

In my last post I explained the concept of resource mailboxes in Exchange Server 2007, and demonstrated the creation of a Room Mailbox for managing meeting room bookings. In this post I will discuss the other type of resource mailbox – Equipment Mailboxes.

Equipment Mailboxes

Many businesses have tools or equipment that is provided by the company for staff to share and use for work related activities. For example, a company might have a portable projector that sales staff can carry to client offices for demonstrations, or a pool car that is used by field technicians to get to remote locations.

In order to manage the allocation of these resources to staff an Equipment Mailbox with a calendar is created so that staff can book the resource using Outlook.To create an Equipment Mailbox launch the New Mailbox wizard in the Exchange Management Console.

equipmb01

After choosing Equipment Mailbox I then choose to create the mailbox with a new user account.

equipmb02

equipmb03

Fill out the user information fields. Although you must choose a password here you are not likely to ever need to use it, so just make it something secure.

equipmb04

Choose a mailbox database to store the Equipment Mailbox.

equipmb05

Complete the New Mailbox wizard. You can now see the newly created Equipment Mailbox in the recipient list for the organisation.

equipmb06

As with the Room Mailbox created in the last post, the Exchange server has automatically disabled the user account associated with the Equipment Mailbox and set the password to never expire.

equipmb07

Equipment Mailboxes also have the “Resource Information” tab the same as Room Mailboxes. Although the “Resource Capacity” field makes little sense for something like a portable projector, it can still be relevant to other uses of the Equipment Mailbox. For example a company car might have the seat capacity listed here.

equipmb08

To automate the booking process you can set the mailbox calendar to automatically accept new bookings.

Set-MailboxCalendarSettings portableprojector
-AutomateProcessing AutoAccept

This will set the Equipment Mailbox to automatically accept any new bookings provided they do not conflict with an existing booking.

Users within the organisation can now add the Equipment Mailbox as a Resource to meeting requests.

equipmb09

In a practical sense the portable projector is invited as an attendee and automatically accepts the booking because there are no prior bookings that conflict with it.

equipmb10

equipmb11

By creating Equipment Mailboxes for shared items within the business it makes it fast and simple for staff to book the items they need when they need them, without incurring any administrative overhead for IT administrators or other staff who might normally manage such resources.


ref: http://www.theemailadmin.com/2009/05/exchange-server-2007-resource-mailboxes-part-2-equipment-mailboxes/

2010年10月26日星期二

PDF Split and Merge

Free PDF Split and Merge
http://www.pdfsam.org/

2010年9月24日星期五

[Olympus] - 如何查快門

如何查快門:
1 開機
2 打開CF倉門(LCD屏會報錯)
3 同時按下menu和ok按鈕(LCD上會出現相機型號)
4.順序按上、下、左、右、快門、上
5.此時進入工程菜單,按右鍵進入page2,字母R后面的數字就是快門數。

2010年9月15日星期三

DNS資源紀錄(Resource Record)介紹

DNS server內的每一個網域名稱都有自己的檔案,這個檔案一般會稱為區域檔案 (zone file),例如之前所提到的”named.ca”或”named.local” 檔案…等等。區域檔案是由多個記錄組成的,每一個記錄稱為資源記錄(Resource Record,簡稱RR)。當在設定DNS名稱解析、反向解析及其他的管理目的時,您需要使用不同類型的RR,底下將介紹常用的RR類型及表示法。


類型


SOA

Start Of Authority,這種 record 放在 zone file 一開始的地方,每一個記錄檔只能有一個 SOA,而且一定是檔案中第一個“記錄”,它描述這個 zone 負責的 name server,version number…等資料,以及當 slave server 要備份這個 zone 時的一些參數。 緊接在 SOA 後面指定了這個區域的授權主機和管理者的信箱,這裡分別是 "school.edu.tw" 和" root.school.edu.tw",也就是school.edu.tw主機和 root 的信箱。這裡要注意的是我們以"root.school.edu.tw"代表"root@school.edu.tw"
e.g.

  @    IN      SOA          school.edu.tw. root.school.edu.tw.  (                                      1999051401      ; Serial                                      3600            ; Refresh                                      300             ; Retry                                      3600000         ; Expire                                      3600 )          ; Minimum        

在兩個括號中間的選項表示SOA的設定內容,底下會有更詳細的說明。


NS

name server,用來指定操作的DNS伺服器主機名稱,需注意的是不可以IP位址表示。
e.g.

 IN  NS   dns.twnic.net.tw.       

A

address,將DNS網域名稱對應到IPv4的32位元位址。
e.g.

 server  IN  A  140.123.102.10       

AAAA

可將DNS網域名稱對應到IPv6的128位元位址。
e.g.

 twnic.net.tw.  86400  IN  AAAA  3ffe: :bbb:93:5       

PTR

pointer,定義某個 IP 對應的 domain name,即將 IP 位址轉換成主機的FQDN。
e.g.

 20   IN  PTR  mail.twnic.net.tw.       

CNAME

canonical name,可為同一部主機設定許多別名,例如 mix.twnic.net.tw的別名可為 www.twnic.net.tw和 ftp.twnic.net.tw,因此所設定的別名都會連至同一部伺服器。
e.g.

 www  IN  CNAME  mix       

MX

mail exchanger,設定區域中擔任郵件伺服器的主機,所有要送往那部機器的 mail 都要經過 mail exchanger 轉送。而數字則是該主機郵件傳遞時的優先次序,此值越低表示有越高的郵件處理優先權。
e.g.

 server  IN   MX  10  mail.twnic.net.tw.           

SOA設定內容說明

SOA record,以之前例子來看,其中 @ 這個符號是縮寫,代表 named.conf 中這個 zone file 所對應的 zone。 SOA 後面的兩個參數是指這個 zone file 是在哪部主機 (school.edu.tw)定義的,以及這個 zone file 的負責人 (注意是寫成 root.school.edu.tw),然後是用括號括起來的 5 個參數, 分別由底下說明。


Serial


Refresh

slave server 每隔這段時間(秒),就會檢查 master server 上的 serial number。不過這裡會發生一個問題就是,在 master server 在 update data 完成到 slave server 來檢查時再 update 可能還有 好一段時間,因此這段期間 master/slave DNS server間 zone files 就可能出現不一致。所以在Bind較新的版本中便加入"notify"功能,使用者在 "named.conf" 設定中在需要的 zone 中加入"notify"的設定,則 master server在 update 完成某個 zone file 的 data 後便會主動發個訊息(NOTIFY),藉以通知該其它的 slave servers,因此如果 slave servers 也有支援這個"notify"功能時,接下來 slave servers 馬上就可以做 zone transfer 來update data。
e.g.

zone "twnic.com.tw" {   type master;  file "twnic.hosts";  notify yes;  also-notify { 192.168.10.1; }; //指定slave server的IP位址 };       

Retry

當 slave server 無法和 master 進行 serial check時,要每隔幾秒 retry 一次。


Expire

當時間超過 Expire 所定的秒數而 slave server 都無法和 master 取得連絡,那麼 slave 會刪除自己的這份 copy。


Minimum

代表這個 zone file 中所有 record 的內定的 TTL 值,也就是其它的 DNS server cache 這筆 record 時,最長不應該超過這個時間。


ref: http://dns-learning.twnic.net.tw/bind/intro6.html

What is an NS record?

An NS (name server) record allows you to delegate a subdomain of your domain to another name server.

For example you have the domain mydomain.com which is using the Domainmonster.com name servers. You decide that you want your own name server (myns.mydomain.com), for which you have already added an A-record, to look after the DNS for a subdomain on your domain: extranet.mydomain.com.

To do this, you would add an NS record for hostname/Zone "extranet" with the name server address "myns.mydomain.com". If someone therefore wants any DNS information about extranet.mydomain.com, our Domainmonster.com name servers will send them in the direction of the server at myns.mydomain.com.

2010年9月6日星期一

SQLite Database Browser

SQLite Database browser is a light GUI editor for SQLite databases, built on top of Qt. The main goal of the project is to allow non-technical users to create, modify and edit SQLite databases using a set of wizards and a spreadsheet-like interface.

ref: http://sourceforge.net/projects/sqlitebrowser/

2010年9月3日星期五

How to do a MX lookup on windows

Here's a little trick you can use to lookup an MX record for a domain. MX records are the Mail Exchanger records in DNS - they specify what IP address email should be directed to for the domain. So open up the command prompt (Start - Run - cmd)

nslookup
> set type=mx
> example.com

2010年8月12日星期四

How to login Symantec Protection Center?

The first login name is "admin" and password is "admin" .You have to change the password after first login.

2010年8月9日星期一

Hyperv Server 2008 R2 bluescreen...probably CLOCK_WATCHDOG_TIMEOUT

ref: http://social.technet.microsoft.com/Forums/en/windowsserver2008r2virtualization/thread/116a0220-6082-47d7-9bcf-bdde87c3ddf7

See this KB article http://support.microsoft.com/kb/975530 for a hotfix for Intel Nehalem processors.

Open a .VHD File in Windows 7

Virtual Hard Disk (.VHD) files are used by Virtual PC and Virtual Server, and created by Windows Backup when you make a system image backup. If you ever need to access files contained within a .VHD, you can do it using the Disk Management tool built into Windows 7. Just follow these steps:

1. Click Start, right-click Computer, and then click Manage.

2. Expand Storage, and then click Disk Management.

3. Click the Action menu, and then click Attach VHD.

4. Click the Browse button, select your VHD file, and then click OK twice.

5. Open Explorer and access the VHD like a newly created hard disk. It’ll show up as a blue disk in the Disk Management snap-in. For example, mine appeared as the H: drive.

ref: http://www.vistaclues.com/open-a-vhd-file-in-windows-7/

Introduction to Microsoft Exchange Server 2003 - RUS

Purpose of RUS in Exchange Server 2003

RUS works hand in hand with GAL (Global Address List). Together they generate the list of addresses that users see in Outlook. I think of Exchange 2003's RUS as a little engine which runs an LDAP query, the results are to build or update the Users' property sheets and the Address Lists.

Here is a list of the jobs that RUS performs:

  • Updates proxyAddresses attribute controlled by recipient policies.
  • Initializes the homeMDB, homeMTA and msExchHomeServerName attributes. Also the legacyExchangeDN and msExchMailboxGUID if appropriate.
  • Sets the showInAddressBook (or hideDLMembership).
  • Sets the ACL on the Microsoft Exchange System Objects (Check with ADSI Edit)
  • Populates the group called Exchange Enterprise Servers in Active Directory.

Exchange 2003 Server RUS (Recipient Update Service)

RUS interacts with Active Directory. In the above diagram you can see how the Recipient Update Service (CPEXCH) is responsible for rebuilding just the domain address lists. Whereas the (Enterprise Configuration) highlighted in the diagram, is responsible for updating the entire Active Directory Forest.

RUS Timings

Exchange's RUS is only as good as the Active Directory information on the domain controller. While RUS suffers more than most services with latency, to be fair, if the Windows 2003 operating system was constantly checking every attribute of every object in Active Directory, then there would be no time for useful work.

Update Now - Recalculates the Exchange 2003 address list memberships. By default RUS recalculates every 15 minutes, so pressing the button can save you waiting and wondering if it worked.

Rebuild - Starts from scratch, rechecks any new extension for example, changing CPEXCH.NET --> CPEXCH.com. Beware that on a production Exchange 2003 server this could take hours.

Re-home RUS (Recipient Update Service)

The time may come when you have to de-commission the Exchange Server which houses RUS. If you need to move the RUS service to another server, then click on the General tab, next to the Exchange server box and then click Browse. Next, in the Select Exchange Server dialog box, click the name of the new Exchange 2003 Server which will host the Recipient Update Service.

Problem with RUS in a large Forest

I would like to share a bizarre problem with you. When a company created new users, sometimes those people had mailboxes and sometimes not. The heart of the problem was that they were a multi domain organization and one domain had user accounts, but no Exchange 2003 servers. (The other domains all had Exchange 2003 servers). What happened was that when they created users in the domain with no Exchange 2003 they pointed the mailboxes to a different domain.

Now for the solution, launch the Exchange System Manager and create RUS in the domain with no Exchange servers. Strange, but true - it solved the problem of the mailbox enabled users with no email address. For me the magic moment was when a new RUS was born, I had no idea that you could create more Recipient Update Services with Exchange System Manager.


ref: http://www.computerperformance.co.uk/exchange2003/exchange2003_recipient_update_service.htm

2010年7月28日星期三

pc inspector

smart recovery