Exchange 2000 and Exchange 2003
Exchange 2000 and Exchange 2003 do not directly offer features to set up managed signatures and disclaimer text. A supported method is to use an SMTP transport event sink. Microsoft has provided the required code for this in order to achieve that via Visual Basic or VBScript.
Exchange 2007
Exchange 2007 has the Transport Rules feature which you can use to set up a default disclaimer for each outgoing email message.
- Open the Exchange Management Console.
- In Organization Configuration select Hub Transport and then select the Transport Rules tab.
- In the Actions Pane click New Transport Rule…
- Name your rule and optionally add a Comment. For instance;
Name: Corporate disclaimer
Comment: This transport rule adds a standardized disclaimer text to all outgoing emails. - Press Next.
- On the Conditions screen select the following 2 conditions;
- from users inside or outside the organization
- sent to users inside or outside the organization
- In the bottom pane, modify the conditions so that they read;
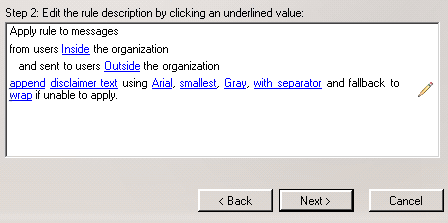
- from users Inside the organization
- and sent to users Outside the organization
- Press Next.
- In the Actions screen select the action;
- append disclaimer text using font, size, color with separator and fall back to action if unable to apply.
- In the bottom pane you can modify the conditions to your preference.
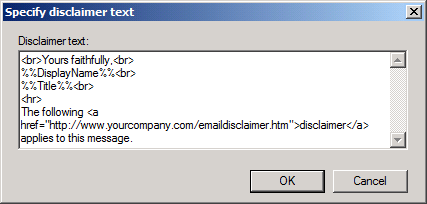
- Click on disclaimer text to set your default text.
Note that the disclaimer text is Plain Text only so you can't type HTML code. If you want to add a link, you'll have to type it in full.
- Click on disclaimer text to set your default text.
- Once done, press Next.
- You can set any exception as you see fit. You can continue without any exceptions as well.
- Press Next.
- On the Create Rule screen you'll see the PowerShell command that will be executed when clicking the New button.
- After pressing the New button the wizard has been completed and a summary is shown. Assuming it completed successfully, your Transport Rule has been created and is active now. Clicking Finish will close the New Transport Rule dialog.

Disclaimer options in Exchange 2007
Exchange 2010
Exchange 2010 also has the Transport Rules feature just as Exchange 2007 but has support for some additional customization as well. The most notable regarding signatures is that HTML code is now supported and that you can also use user information that has been stored in Active Directory to construct the signature dynamically.
- Open the Exchange Management Console.
- In Organization Configuration select Hub Transport and then select the Transport Rules tab.
- In the Actions Pane click New Transport Rule…
- Name your rule and optionally add a Comment. For instance;
Name: Corporate signature
Comment: This transport rule adds a standardized signature and disclaimer text to all outgoing emails. - Press Next.
- On the Conditions screen select the following 2 conditions;
- from users that are inside or outside the organization
- sent to users that are inside or outside the organization, or partners
- In the bottom pane, modify the conditions so that they read;
- from users that are Inside the organization
- and sent to users that are Outside the organization
- Press Next.
- In the Actions screen select the action;
- append disclaimer text and fall back to action if unable to apply.
- In the bottom pane you can modify the conditions to your preference.
- Click on disclaimer text to insert your default disclaimer text and add variables to include user information (see below for an overview of variables which you can use).
Note that the disclaimer text allows you to use HTML code (including in-line CSS). This will allow you for instance to set different font size and colors for the signature and disclaimer part, add a horizontal line, hyperlink text or include a logo. - You can use up to 5000 characters
- When a Plain Text message is sent, the HTML tags are automatically stripped off.
- Click on disclaimer text to insert your default disclaimer text and add variables to include user information (see below for an overview of variables which you can use).
- Once done, press Next.
- You can set any exception as you see fit. You can continue without any exceptions as well.
- Press Next.
- On the Create Rule screen you'll see the PowerShell command that will be executed when clicking the New button.
- After pressing the New button the wizard has been completed and a summary is shown. Assuming it completed successfully, your Transport Rule has been created and is active now. Clicking Finish will close the New Transport Rule dialog.
Supported variables
You can use the following variables in your disclaimer text. When using them, place them between %% characters.
Example: %%DisplayName%%
| UserLogonName DisplayName FirstName Initials LastName PhoneNumber OtherPhoneNumber HomePhoneNumber OtherHomePhoneNumber PagerNumber MobileNumber FaxNumber OtherFaxNumber | Street POBox City State ZipCode Country Title Department Manager Office Company Notes CustomAttribute1 – CustomAttribute15 |

Disclaimer template text with HTML and variables in Exchange 2010
Outlook Signature deployment via script
If you are not using Exchange or are looking for a client (Outlook) level solution to generate your signatures, you can do this via a script. There are various ways to do this of course but there are a couple of common things to keep in mind when going for a custom script;
- The signature has to end up in the user's Signatures folder.
- A single signature contains a Plain Text, HTML and Rich Text version of your template with their corresponding file formats;
*.txt, *.htm and *.rtf - You'll need to query Active Directory via LDAP if you want to include user specific information.
- Consider how you want to update the signature. For instance;
Are you going to run the script each time at logon or only once and then users can run the script manually via a Start Menu shortcut? - Are you going to disable access to the Signature feature via Group Policies?
- Note that you cannot set the deployed signature as the default via Group Policies; this requires an additional script that queries the mail profile registry and sets the appropriate registry keys (see below script example for further details).
As mentioned before, you'll require an additional script if you want to set the generated signature directly as the default in Outlook without any additional user interaction. This additional script can be simplified if all your mail profiles are named the same in your organizations and have been created by a prf-script via the Office Resource Kit (ORT) or Office Customization Tool (OCT).
When you automated the mail profile creation process, then it could be that the mail profile registry is structured in the same way on all your clients. Setting the created signature as the default can then be done via an import of exported registry keys. If not, you'll have to query the mail profile registry keys via a vbs-script and set the values accordingly. The registry keys involved are structured in the following way;
Key: HKEY_CURRENT_USER\Software\Microsoft\Windows NT\CurrentVersion\Windows Messaging Subsystem\Profiles\
In the key, replace
In this key set the following value names and types;
Value name: New Signature
Value name: Reply-Forward Signature
Value type: REG_BINARY
As for the value for this key, since these are binary keys, the easiest would be to export these 2 values from a correctly configured machine to determine their corresponding value.
ref: http://www.howto-outlook.com/howto/corporatesignatures.htm